There's no point in trying to call home again: if your relatives have gone out and haven't returned home yet, they won't be able to answer the landline. I know, you're anxious; you want them to go to your computer to check if the virus scan was successful and you don't want to wait any longer. But after calling a dozen times in an hour, maybe you should start thinking about a workaround.
How do you say? Have no idea what to do? Well then roll up your sleeves because in the course of this tutorial I will explain to you how you can remotely connect to another PC . Carrying out this procedure could be very useful because it will allow you to carry out all the checks you want on your PC in a completely autonomous way, without having to ask others for the operation, by downloading a program or using an integrated utility.
Do you want to know which software I recommend to connect to your home PC remotely and which of these to use when you are away from home? Well, then you just have to sit back and take a few minutes of free time to read this tutorial of mine dedicated to the matter. I wish you a good reading.
Index
- Integrated solutions to connect remotely to another PC
- Preliminary operations
- Remote Desktop (Windows)
- Screen Sharing (macOS)
- How to remotely connect to another PC with TeamViewer
- Other programs to remotely connect to another PC
Integrated solutions to connect remotely to another PC
To begin, I would like to tell you about the integrated Windows and macOS solutions dedicated to remote control, which are, respectively, Remote Desktop (with RDP protocol) and Screen Sharing (with VNC protocol).
However, I think it is necessary to make a clarification immediately: the Remote Desktop server is not present in the Home versions of Windows : therefore, if you use any Microsoft operating system in the Home version, you can use the client to connect to other computers, but not receive remote assistance. If you find yourself in this situation, you can still turn to TeamViewer or other alternative software designed specifically for remote control, which I will tell you about later.
Furthermore, both Remote Desktop and Screen Sharing are designed primarily for use from computers connected to the same local network : in this scenario, it is sufficient to configure the server to be controlled in an appropriate manner and establish the connection to it using any other device connected to the same LAN/Wi-Fi network. To use the two utilities from the Internet, on the other hand, you need to make some preliminary options to prepare the computer and the router to accept connections: you will find everything explained in the following sections of this guide.
Preliminary operations
If you intend to control a computer via Remote Desktop and/or Screen Sharing via a device connected to the same network , you can skip directly to the dedicated section of this chapter, as the following indications are useful for "preparing" the server to accept connections from 'external.
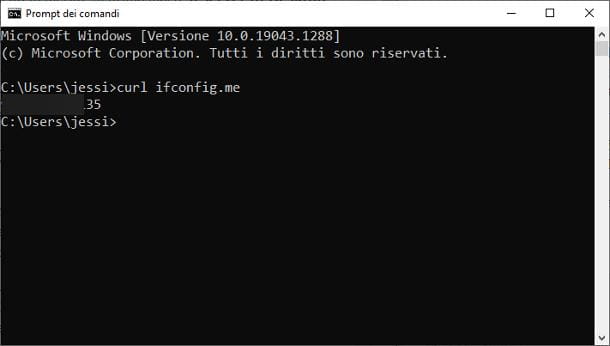
To begin with, you need to get the public IP address of the computer to check, using the Windows Command Prompt (accessible from the Start menu ) or the macOS Terminal ( whose icon resides in the Go > Finder Utilities menu). Once you have started the most suitable program for your operating system, issue the command and press the Enter key on your keyboard to view the IP assigned to your computer on the Internet.curl ifconfig.me
If you find it difficult to remember the numerical IP of your computer, or if your connection is associated with a dynamic IP (i.e. an address that changes every time you turn off or disconnect the router from the network), you can set up a dynamic DNS address , even for free : in simple terms, it is a question of associating a fixed literal web address to a numeric IP address , whose reference IP is automatically updated with each change. In practice, dynamic DNS allows you to reach a server by always entering the same literal address and without worrying about retrieving the numeric one each time.
To learn more about the subject, I invite you to consult the dedicated section of this tutorial of mine , where you will find all the useful information to be able to create and configure a free dynamic DNS to be associated with the router's IP.
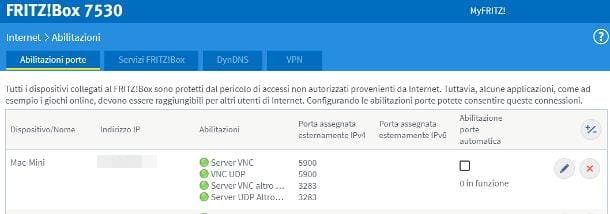
Another operation that you must necessarily perform is to open the router ports associated with the Remote Desktop or Screen Sharing services, to make the computer to be controlled directly accessible. To be precise, for Windows Remote Desktop , you need to open ports 3389 , 443 and 8245 , all with TCP and UDP protocols ; for macOS Screen Sharing , the ports to open are instead 3283 and 5900 , both TCP and UDP . If you don't know how to open router ports, I refer you to reading the specific tutorial I dedicated to the subject.
Once the routing of connections to the computer to be controlled has been correctly configured, it's time to explain how to configure them appropriately.
Remote Desktop (Windows)
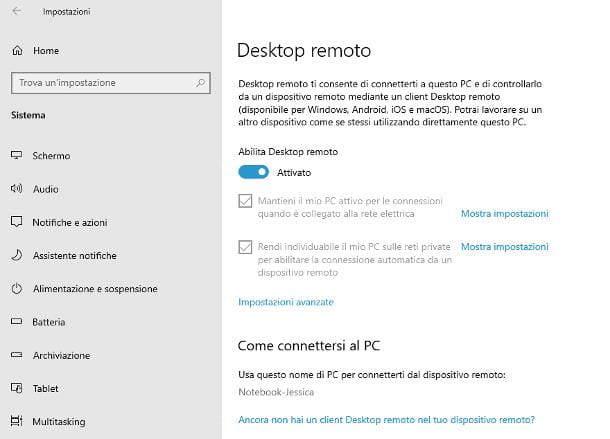
To activate the Remote Desktop server , if you use Windows 10 or a later edition of the operating system (e.g. Windows 11 ), you must act from the operating system Settings , which you can access by opening the Start menu (by pressing the Windows flag located at the bottom of the application bar) and clicking on the gear symbol residing inside it. Then, use the new window that opens on the desktop to reach the System and Remote Desktop sections , move the Enable Remote Desktop switch from OFF to ONand click the Confirm button if necessary.
By default, Remote Desktop sessions can only be started and used by users with administrative privileges; to change this behavior, click on Select users who can access this PC remotely or Remote desktop users residing in the same window, press the Add… button and type the username of the person for whom to allow remote access, at inside the designated text field. To confirm, click on the Check names and OK buttons .
Finally, if you intend to access the computer using a device connected to the same local network , write down the name specified under the heading Use this PC name to connect from the remote device or Use this name to connect to this PC from another device , as you will need it to establish the connection from the "control" device.
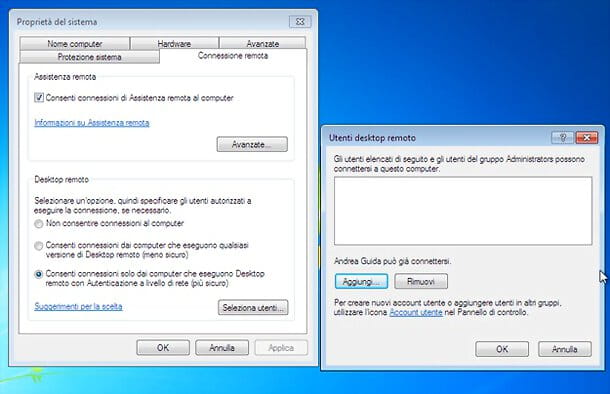
If you use a previous edition of Windows , you must instead use the Control Panel : therefore open the Start menu , type the words remote desktop in the appropriate search field and click on the wording Allow remote access to the computer . Now, select the box next to the item Allow Remote Assistance connections to your computer , press the Advanced button and, if it is not already there, put the check mark next to the item Allow control of the computer from remote locations and click OK .
Now, specify whether to allow from computers running any version of Remote Desktop or whether to allow connections only from computers running Remote Desktop with network level authentication , click the Apply button and, you want all users (and not just those with privileges administrators) can start remote desktop sessions, click on the Select users button and enter their username in the appropriate text field.
Subsequently, click on the OK button to confirm the applied modification and press several times on the OK or Apply buttons , in order to activate Remote Desktop .
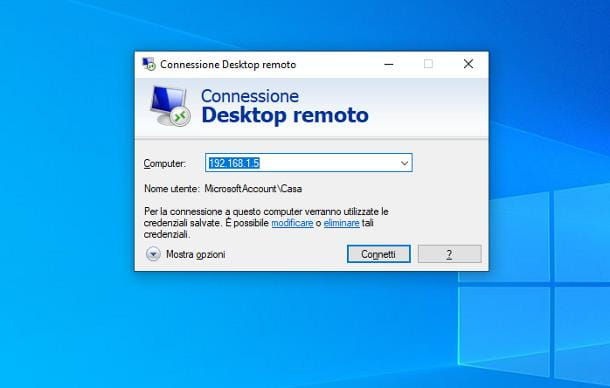
Once the computer to be controlled is configured in an appropriate manner, you can easily access it using the Remote Desktop client included in Windows: to start it, open the Start menu , type the words Remote Desktop Connection and click on the first result received.
Once in the configuration window, enter the name (for internal network connections) or the public IP address/dynamic DNS (for those established via the Internet) of the server to connect to, press the Connect button and answer affirmatively to the connection key warning; finally, enter the username and password of the account with which to take control of the computer and press the OK button , to finish.
In addition to Windows, the Microsoft Remote Desktop client is also available on the Mac App Store for Macs, the Play Store and alternative markets for Android , and the App Store for iOS and iPadOS. Operation is quite similar to the Windows client.
Screen Sharing (macOS)
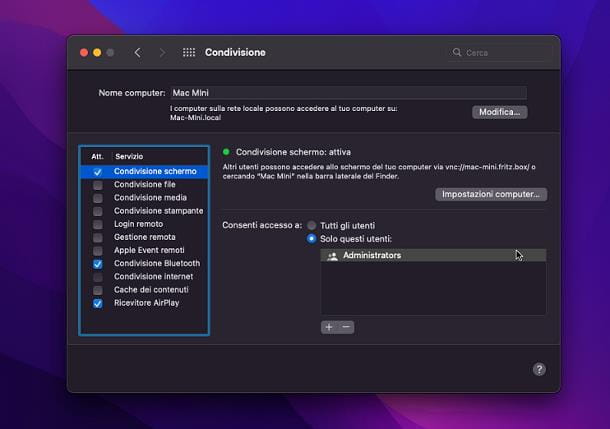
To activate macOS screen sharing and prepare the computer for remote access, you must act from the System Preferences , accessible by clicking on the resident gear icon in the Dock bar . Once this is done, click on the Sharing icon , put the check mark next to the Screen Sharing item (located on the left) and press the Computer Setup… button , to specify the connection settings.
Now, check the boxes for Anyone can request permission to control the screen and VNC viewers can control the screen with a password , and then enter a password to be used to secure remote connections in the appropriate field.
Once this step has also been completed, click the OK button to return to the previous screen and, if you want all users (and not just those with administrative privileges) to be able to access the Mac via a remote session, put the check mark next to the All users item And that's it; otherwise, choose the Only these users option , click on the [+] button visible just below and then on the name of the user to authorize; finally, press the Select button and repeat the same steps, if necessary, for all the other accounts to which to allow remote access.
Finally, if you intend to control the computer using a device connected to the same local network, take note of the address located immediately under the heading Screen sharing: active , next to the writing vnc:// (eg mac.localor 192.168.1.3).
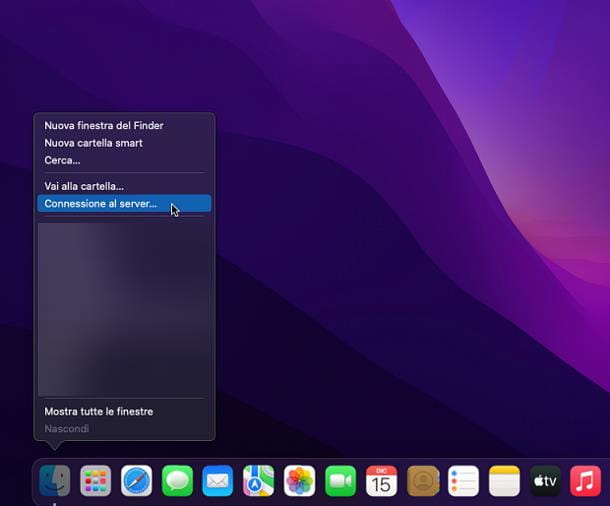
To access the newly configured Mac from another Mac, right-click on the Finder icon (the smiley face icon located in the Dock ), choose the item Connect to server… from the displayed context menu and type the address vnc://indirizzo_MACin the window that appears, taking care to replace the wording with indirizzo_MACthe name/private IP of the computer (if accessing from the LAN) or its public IP/dynamic DNS (if accessing from other places on the Internet).
Now, click on the Connect button , enter the previously configured password and log in to your user profile, using the classic macOS login screen.
In addition to the dedicated Finder feature, you can remotely connect to a screen-sharing Mac using any VNC client , such as the VNC Viewer software available for Windows , Android , iOS , and iPadOS .
How to remotely connect to another PC with TeamViewer
How do you say? Do you think that the solutions I have proposed so far are far too complex to put into practice, or do you have a computer equipped with a Home version of Windows and which, consequently, does not have a remote desktop server? Don't worry, there are many programs that allow you to set up any computer for remote access over the Internet.
Among these, TeamViewer certainly deserves mention : in this case, it is a software that allows you to remotely control a computer in a practically immediate way, without the need to configure ports, IP addresses or similar details.
To be precise, the program allows you to quickly transfer files from one computer to another, manage updates remotely, access unattended and much more. The use of TeamViewer is free only for personal and non-commercial purposes ; otherwise, you need to take out a subscription, with prices starting from €29.90/month .
Having said that, let's see together how to proceed. First, position yourself in front of the computer to be monitored , connect to the TeamViewer website and click on the Free Download button to start downloading the program installation file. Once you have the latter, open it and follow the procedure that best suits your operating system.
- Windows : put the check mark next to the wording Default installation , click on the buttons Accept — next and Yes and put the check mark next to the option I want to use the free version for personal use . To conclude the installation of TeamViewer and start the program, press the Finish button .
- macOS : double-click on the Install TeamViewer file visible in the Finder window that opens, click on the Open button (if necessary) and put the check mark next to the wording I Accept the EULA . Now, click on the Continue and Continue buttons (two consecutive times), enter the Mac password in the window that appears on the screen and press Enter to start installing the program, after which you should be asked to grant some permissions necessary for its functioning. To do this, click on the Configure Permissions and Open System Preferences buttons, select the Accessibility item (on the side) and check all the boxes related to TeamViewer . Finally, repeat the same operation also for the Screen recording and Full disk access sections and, finally, exit System Preferences. If changing the settings should be blocked, click on the locked padlock symbol located at the bottom left of the System Preferences, enter the Mac password in the appropriate field and press Enter .
If you encounter problems or difficulties in completing the download and installation of TeamViewer , I suggest you read the tutorial I dedicated to the subject, in which I explained how to act in detail.
If you are unable to install programs on your computer, you can also use TeamViewer QuickSupport , a "light" version of TeamViewer that does not require installation but which does not, however, have some of the features characteristic of the full version. You can always get it from the TeamViewer website .
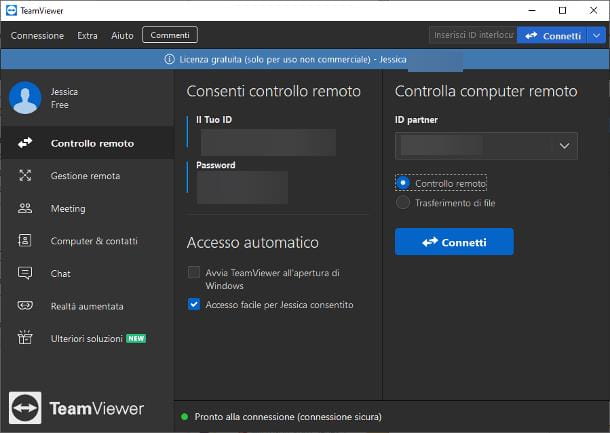
Once the program has been installed, wait for it to start (or open it manually, using the icon that has been added in the meantime to the Start menu of the PC or to the Launchpad of the Mac) and open the Remote Control tab by clicking on the symbol of the two horizontal arrows of opposite direction located laterally. Now, write down (or ask the user to whom you need to provide remote assistance to communicate) the numerical codes corresponding to the items Your ID and Password , essential for establishing the connection.
To control a computer configured with TeamViewer using a device of the same type, you can also install the same program on the "control" PC (the instructions are the same seen above); to perform remote access from smartphones and tablets, on the other hand, you must use the Team Viewer Remote Control app, which can be downloaded free of charge from the Android , iOS and iPadOS stores .
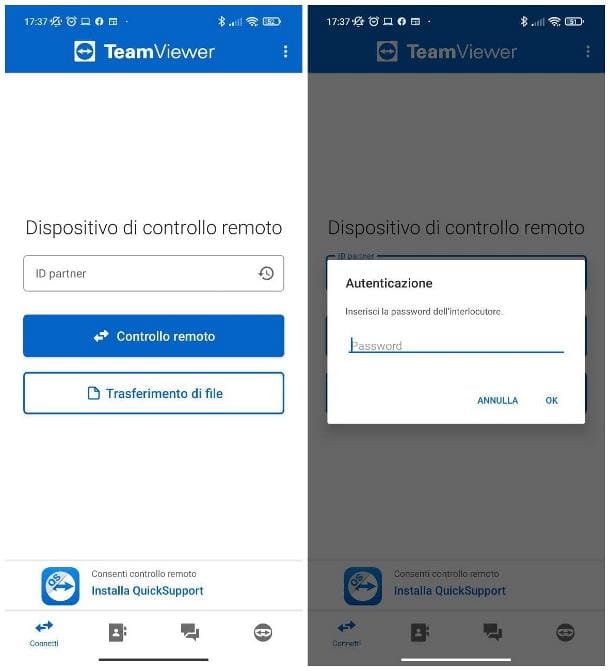
All clients work in roughly the same way: after starting the program or app in question, go to the Remote Control tab ( horizontal arrows in the opposite direction), enter the partner ID obtained previously in the appropriate field and, if you are working from a computer, put the check mark next to the Remote control item .
Finally, press the Connect or Remote Control button , type the access password you obtained previously and hit Enter : after a few moments, you should see the desktop of the remote computer, which you can control as if you were in front of your screen. If you use TeamViewer for smartphones and tablets, you will also see a short tutorial on the gestures to use. For more information about the use of TeamViewer , I refer you to reading the thematic guide I dedicated to the program.
Other programs to remotely connect to another PC
If, for some reason, TeamViewer did not meet your needs or if you want to know some useful alternative tool to remotely connect to another PC , you will be pleased to know that there are many other monitoring servers, some even free, equally valid. Below I list a few.
- AnyDesk ( Windows/macOS ): This is a feature-rich, highly configurable program with a very intuitive user interface. Computers can be controlled not only with the same program but also via apps for Android , iOS and iPadOS . The software is free if used for personal purposes, otherwise you need to purchase a license.
- SupRemo ( Windows / macOS ): is another excellent software that allows you to configure remote access to a computer in just a couple of clicks, without having to fiddle with parameters such as IP, ports and so on. Computers configured with SupRemo can be controlled using the same software, or using the applications available for Android , iOS and iPadOS . SupRemo can be used free of charge only for non-continuous use for personal purposes, otherwise you need to subscribe to a paid plan.
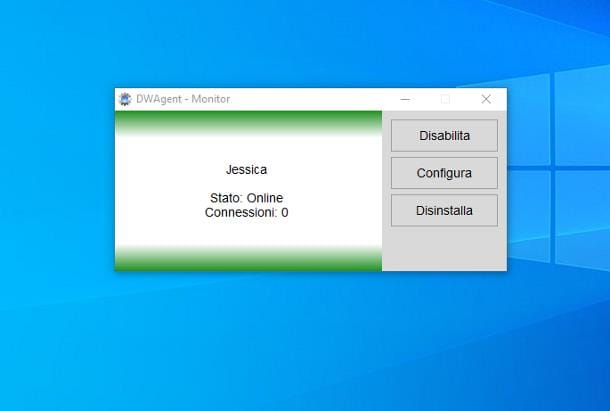
- DWService ( Windows ): more than a program, it is a real platform dedicated to remote control, which works by combining a Web server with a specific client available for Windows. There is also a version dedicated to Mac but, being a 32-bit application, it cannot be run on macOS 10.15 Catalina and later versions of the Apple operating system. The use of the DWService platform is completely free, both for personal and commercial purposes.
For further information, I refer you to reading my in-depth analysis dedicated to remote access programs , in which I studied the methods of using the software mentioned a moment ago and suggested other programs and apps of this type.