You have a USB stick with files and documents of a certain importance and you want to prevent anyone from accessing the files contained in it if you lose it. Considering that you are careless, indeed very careless, losing your USB stick is now part of your typical day with all the consequent risks. But don't worry, because I have a solution for you.
How about encrypting the contents of your USB stick? That's right, I'm talking about protecting the data on your flash drive with a password and making it inaccessible to malicious people and meddlers. In this way, even in the event of theft of the USB stick, the thief would never be able to read its contents, unless he knows the password. I assure you: a few clicks and your pendrive will become as secure as that of a secret agent!
Courage, don't waste any more time and get to work right away: take five minutes for yourself, read the instructions I'm about to give you and find out how to put the password on a USB stick using some of the best free solutions currently available: whether you have a Windows PC or a Mac, you will surely find what is right for you. Happy reading and good luck with your data protection!
Index
- How to put password on a USB stick: Windows
- How to put password on a USB stick: Mac
- Programs to put the password on a USB stick
How to put password on a USB stick: Windows
If you use a recent version of Windows, for example Windows 10 or Windows 11 , and more particularly a Pro, Enterprise or Ultimate edition of the operating system, you can encrypt your USB sticks with BitLocker : a technology that allows you to encrypt the contents of hard disks, keys and other storage units using the most advanced security standards of the moment.
BitLocker — it is good that you know this — does not require formatting of the units subjected to encryption but makes them usable only on PCs equipped with Windows Vista or later versions of the Microsoft operating system (regardless of their edition). Having made these necessary premises, we can move on to action.
Then connect the USB stick you want to encrypt to your PC, open the File Explorer (the yellow folder icon located at the bottom left, on the taskbar) and select the item This PC/Computer from the left sidebar . At this point, right-click on the flash drive icon , select the Activate BitLocker item from the menu that appears and wait a few seconds for the unit to be examined.
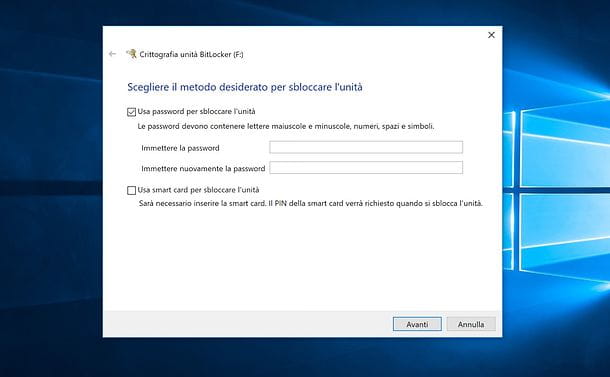
When the operation is completed, in the window that appears on the screen, put the check mark next to the item Use password to unlock the unit (so that a password is required to access the data on the pendrive), type in the fields Enter the password e Enter the password again the password you intend to use to protect the flash drive and click on the Next button located at the bottom right.
At this point, choose whether to save the backup of the recovery key (the backup key used to unlock the drive encrypted with BitLocker in case of password loss) in your Microsoft account (therefore in the cloud), in a file (from save on the PC) or by printing it, click again on Next and choose the encryption mode to apply to the pendrive.
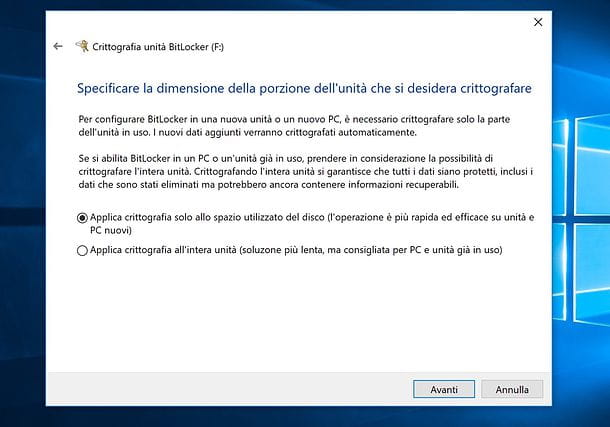
You can choose to apply encryption only to the space used by the disk , therefore only to the data currently present on the stick (quick operation), or to apply encryption to the entire drive , thus also encrypting the space on the drive which is empty but which could contain traces of files previously deleted from the pendrive (slower operation). My advice is to opt for the second option, but if you're in a hurry and you've never kept sensitive files for your privacy on the flash drive, you can also choose the option to encrypt only the space used by the disk.
Now you have to choose whether to create a slightly less secure key compatible with all versions of Windows or a "super-secure" key (with XTS-AES encryption) compatible only with Windows 10 1511 and later versions: in the first case, put the sign of tick next to the Compatible Mode entry . In the second, however, put the check mark next to the New encryption mode item . I advise you to create a flash drive in "compatible mode", which is still very secure and offers more flexibility than flash drives made with the "new encryption mode".
Then press the Next button , then Start encryption and wait patiently for the encryption of the pendrive (or rather, its contents) to be completed. The operation could also take several minutes.
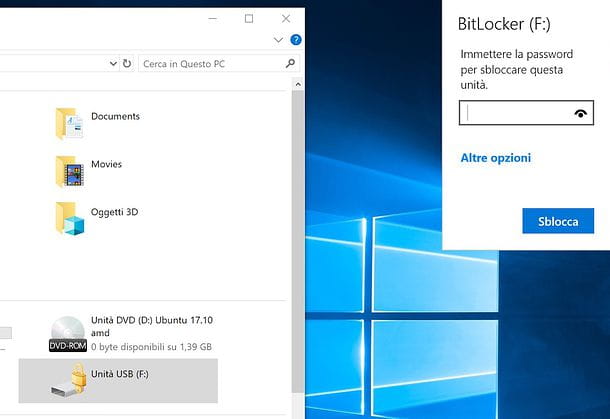
After activating BitLocker encryption on the stick, to access the contents of the latter you will be asked to type a password: if you do not type the correct password you will not be able to access and modify the files on the unit.
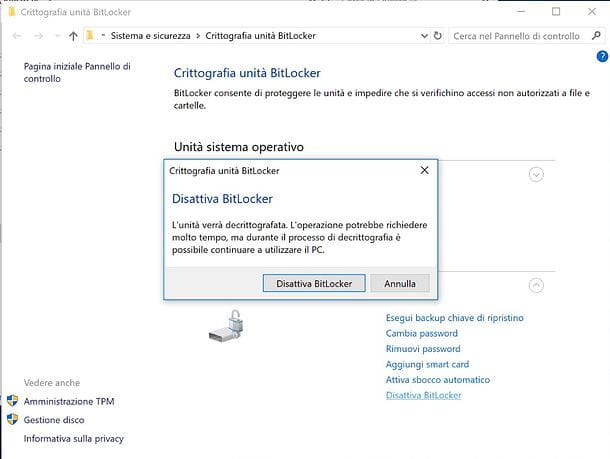
If you change your mind, you can remove the BitLocker encryption by doing the following: open Windows File Explorer, select This PC/Computer from the left sidebar, right click on the flash drive icon and select the option Manage BitLocker from the context menu.
In the window that opens, click on the Deactivate BitLocker item located below, answer Deactivate BitLocker to the warning that appears on the screen and wait patiently for the encryption removal procedure to be completed (it could take several minutes).
Once BitLocker encryption has been deactivated, you will be able to access the content of the key (which will remain intact) and modify it without having to enter the password again. In addition, the key will also become compatible with versions of Windows that do not support BitLocker and with operating systems other than Windows (provided it uses a file system compatible with the latter, eg exFAT ).
How to put password on a USB stick: Mac
If you have a Mac , you can use Disk Utility (the default macOS utility for managing disks and partitions) to create an encrypted image file on your flash drive and keep all the data you deem most important inside.
An encrypted image file is like a normal dmg file (the kind downloaded from the Internet and containing programs for macOS), but its content can be freely modified and a password is required to open them. Interesting, right? Then jump right into action!
To create an encrypted image file on your USB stick, connect the stick to your Mac and choose whether to format it or not. If you want to format the unit, follow the instructions in my tutorial on how to format a USB stick with Mac (remembering that to create a stick that is also compatible with Windows you must use a file system between FAT and exFAT and an MBR partition system ).
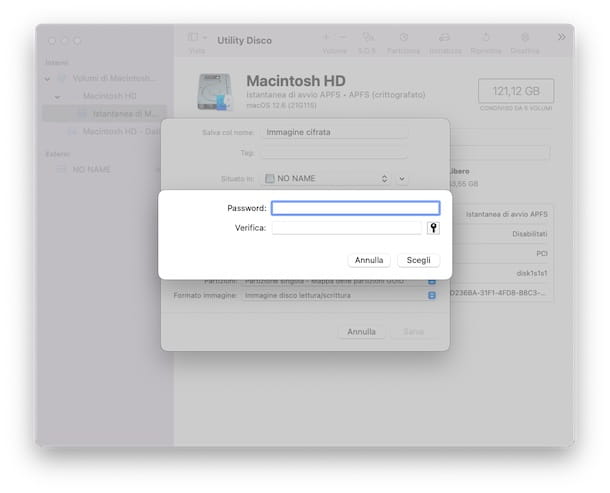
At this point, start Disk Utility (which you can find in the Other folder of the Launchpad or search in Spotlight ), went to the File menu located at the top left and select the items New image> Empty image from the latter.
In the window that opens, make sure the Read/Write Disc Image option is selected in the Image Format menu , choose an Encryption type between 128-bit AES Encryption (recommended) and 256-bit AES Encryption (more secure, but more slow) and, in the window that opens, type the password you want to use to protect the image file to be created on the stick (repeating it in the Verify field and pressing the Choose button ).
At this point, move to the Dimensions field and choose the maximum dimensions that the image file must have (i.e. the maximum dimensions of the files that it must contain overall), choose the file system you intend to use from the Format drop-down menu (I advise you to use the same file system used for the key, e.g. Mac OS extended (journaled) if you intend to use the pendrive mainly on Mac or FAT/exFAT if you intend to use the unit also on Windows PCs), select your USB key from the menu Located in and start the creation of your encrypted image file by pressing the Save button .
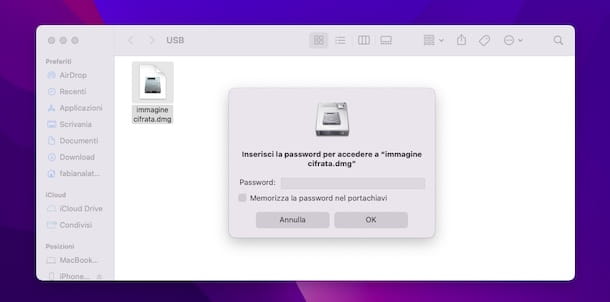
Mission accomplished! Now you have your image file in dmg format in which to insert the data you want to keep securely on your USB stick. To use it, access the USB stick by double-clicking its icon on the macOS Desktop, open the encrypted dmg file and type the password.
At this point, copy the files inside the image file as if it were a normal folder and, when the work is completed, "unmount" the latter by right-clicking on its icon on the desktop and selecting the Eject [file name image] from the menu that opens. Alternatively, you can move the image file icon from the Desktop to the Trash or click the ? present in the Finder sidebar , next to the image file name.
N.B.: only the files placed inside the encrypted dmg file will be password protected, the files copied normally on the stick (outside the image file) will not.
Another important thing to underline is that the encrypted image files, being in dmg format, are designed to be used mainly on Mac. However, there are programs (almost always for a fee) that allow you to use them on Windows as well. More info here .
Programs to put the password on a USB stick
To encrypt a USB stick and protect it with a password supported by all operating systems, I suggest you use VeraCrypt : a free and open source software (evolution of the now obsolete TrueCrypt) thanks to which it is possible to create encrypted volumes in an extremely simple way on Windows, macOS and Linux.
To download it to your PC, connect to its official website and click on the link for the operating system you use, for example VeraCrypt Setup xx.exe if you use Windows or VeraCrypt_xx.dmg if you use macOS.
If you have a Mac, to use VeraCrypt you must also install the free FUSE for macOS software : then connect to this web page and click on the MacFuse xxx link located on the right. Also keep in mind that, at least for the moment, VeraCrypt for macOS is only usable in English, but the instructions I'm about to give you are identical on both operating systems.
At the end of the download, therefore, if you use a Windows PC , double-click on the downloaded installation file ( VeraCrypt Setup xx.exe ) and click on the Yes button . In the window that opens, press the OK button relating to the installation language (Italian), then check the item I accept the license terms and complete the setup by first clicking on the Next button twice consecutively and then on the Install buttons , OK , Done and No .
If you use a Mac , as already mentioned, before proceeding with the installation of VeraCrypt you must install MacFuse. So open the dmg file of the program and, in the window that appears on the screen, double-click on the Install macFUSE icon : now press the buttons Happy , Continue (twice consecutively), Accept and Install .
Then enter the password of your user account on macOS (the one you use to access the system) and complete the setup by first pressing the Install software button and then the Open Security preferences button . Now, in the window that opens, click on the padlock icon at the bottom left, enter the system password again and click on the Allow and Restart buttons , then wait for the Mac to restart.
Once FUSE for macOS is installed, you can move on to installing VeraCrypt. Then open the dmg package of the program, start the executable VeraCrypt_lnstaller.pkg contained within it and, in the window that opens, first click on the Continue button two consecutive times and then on the Accept and Install buttons . Then enter the password of your user account on macOS and complete the macOS installation procedure by first pressing the Install software button and then the Close and Move buttons .
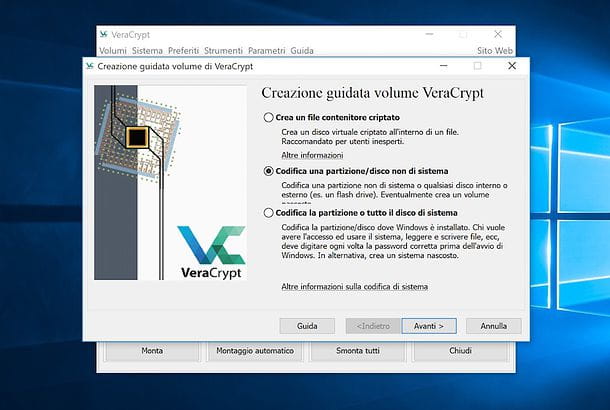
After the installation is complete, connect the USB stick to be encrypted and password protected to your PC and start VeraCrypt . At this point, click on the Create a VeraCrypt volume button, put the check mark next to the item Encrypt a non-system partition / disk and first press the Next button and then Yes .
Now, put the check mark next to the standard VeraCrypt volume item and first press the Next button and then the Select drive button to choose the device to encrypt, then your USB stick (called Removable disk D: ).
Once this step has also been completed, click on the OK and Next buttons , then choose whether to create and format the encrypted volume or whether to encrypt the partition in place : using the first option, the key will be formatted (therefore its contents will be deleted) and then encrypted .
By choosing the second option, however, the files on the unit will be stored and encrypted, through a procedure that will take quite a bit of time (even several hours). Personally, I recommend formatting the drive.
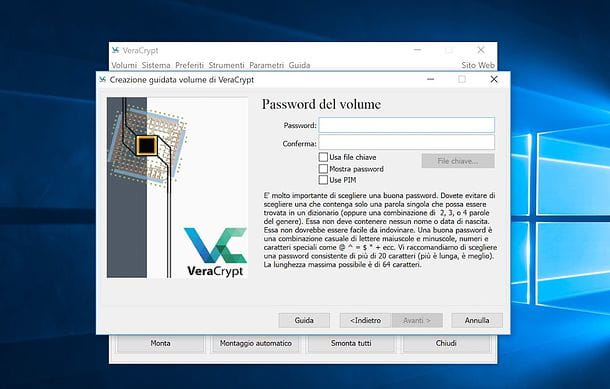
Now, choose an encryption algorithm and a confusion algorithm among those available (if you are not sure what to choose, leave the default settings active, then AES and SHA-512 ), click Next , make sure the detected drive size from VeraCrypt are correct and presses the Next button again .
On the next screen you need to set the password to use to encrypt (and decrypt) the key: enter it in the Password and Confirm fields and go on .
So choose whether to keep large files on the stick (in order to decide which file system to use) by selecting an option between Yes and No , click on Next and use the File system drop-down menu to choose which file system to use.
Personally, I advise you to choose FAT if you don't intend to keep files larger than 4GB on the stick or exFAT if you intend to keep files bigger than 4GB on the stick (in this way the unit will also be readable by Macs and computers equipped with Linux ).
Subsequently, choose whether to perform a quick format of the drive by placing the check mark next to the appropriate item (choose this option only if the flash drive does not contain sensitive data potentially recoverable thanks to programs for recovering deleted files ), move the mouse cursor over the completion bar at the bottom so that it turns completely green and start formatting the drive by first pressing on Format and then on Yes .
Once the formatting and encryption of the flash drive has been completed, click on the OK button (two consecutive times) and then on the Exit button . Good! Now you have a password protected flash drive ready to house all your most important data.
To use the pendrive and then copy new files on it (or access the data already present on it), start VeraCrypt , press the Select drive button located at the bottom right and choose your pendrive from the window that opens.
After that, choose a drive letter to which you want to associate the encrypted volume and click on the Mount button or on the VeraCrypt Automatic Mount button (depending on whether you want to mount the drive only once or automatically every time you connect the stick to your computer).
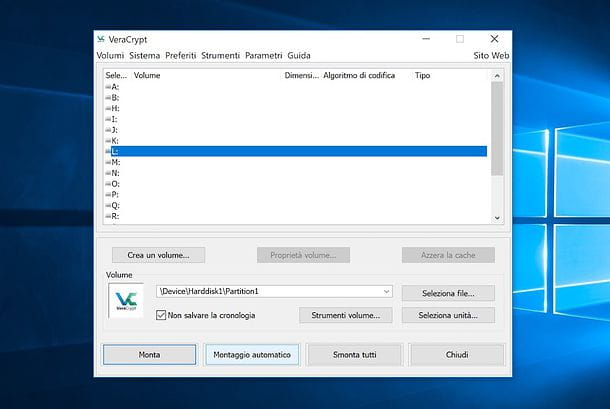
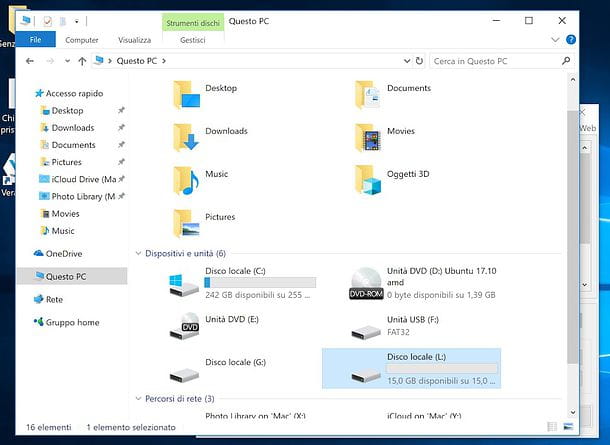
Finally, type the password needed to decrypt the pendrive in the window that opens and presses the OK button . Mission accomplished! Now you can open File Explorer (if you're using Windows) or Finder (if you're using macOS) and access your encrypted key as if it were a common USB key.
After using the unit, remember to unmount it by opening VeraCrypt, selecting the drive letter to which you associated the stick and pressing the Unmount button located at the bottom left.
In case of second thoughts, you can disable the encryption of the stick and remove the password request to use it from VeraCrypt. Then open the program, press the Select drive button located at the bottom right and select your flash drive from the window that opens. Then click on the Volume Tools button , select the Permanently decrypt item from the menu that opens and answer Yes to all the warnings that appear on the screen.
In conclusion, enter the password to decrypt the key, press the Next button , answer Yes to the warnings that appear on the screen and conclude the procedure by first pressing on Decryption and then again Yes and The volume does not contain any hidden volume. Proceed .
Note: if when you connect a key encrypted with VeraCrypt to your PC, Windows or macOS tell you that the drive is unreadable and ask you to format it, ignore the error and proceed to mount the volume with VeraCrypt, as I explained in the tutorial.
In addition to what has just been described, there are other programs that you can use to securely encrypt your USB stick. Personally, if you are looking for other solutions, I advise you to opt for programs capable of generating encrypted zip archives such as 7-Zip which I have told you about in depth in this guide and in this other tutorial dedicated to the subject . It is a simple solution to use and rather fast as regards the encryption procedure, which is certainly worth considering.